Hillside Terracing: a primer
 What is an A-frame? The A-frame is an accurate and simple tool for measuring and marking level contours on a hillside field to be stabilized by terracing.
What will I need to make the A-frame? You will need three straight branches, two (of equal length) about 2 meters long and the third about 1 meter long; string to affix the branches together and a length to suspend the plum bob; and a plum bob, possibly a pointed rock or bottle weighted with small stones. You will also need numerous stakes to mark your contours across a hillside.
How to make the A-frame
1) Tie the two long branches together at one end with a length of string--that will be the top of the frame. Once the branches are affixed, separate the branches by pull them apart at the bottom, these will be the legs of the A-frame.
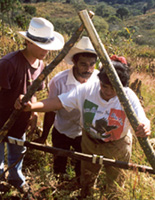
2) Tie the shorter branch approximately 1/3 of the length of the leg from the ground on both sides (try to be exact as possible). This will create the “A” of the A-frame (see photo).
3) Tie a length of string to the top of the frame and hang the plumb at the end so that it will swing freely, but will hang below the horizontal branch.
Finding Level
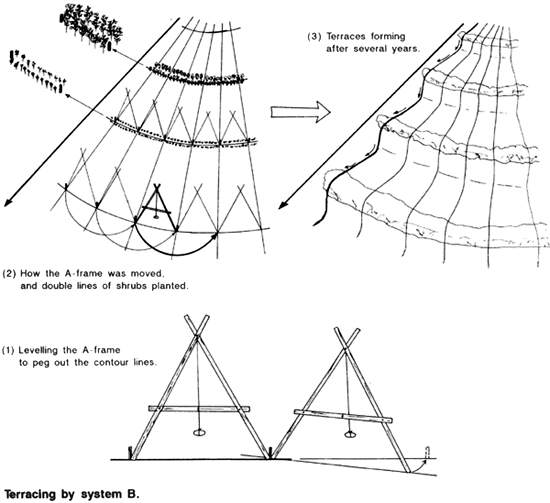
Even terrain – Next you need to find where the string will touch the horizontal branch when the two ends are on level ground. If you are on level ground, mark with a small notch where the string rests against the horizontal branch. Rotate the A-frame 180-degrees and set it back on exactly the same position. Note if the string sits on the notch—if it is not, then your location isn’t level.
Uneven terrain – A method to find level on any terrain is to drive two stakes into the ground spaced apart so that the A-frame can be places with one leg on each stake. Once positioned on the stakes, mark where the plumb line touches the cross branch, then rotate the frame 180 degrees and repeat. Place a larger mark exactly half the distance between the original two marks. This is level.
To Mark a Contour
Place a stake into the ground at the starting point and put one leg of the A-frame next to the stake—on the uphill side. Locate the other leg of the A-frame where the plumb line crosses the level mark and drive a stake by the leg—on the downhill side. This becomes the new starting stake. Continue in this way across the hillside.
Contour lines should be placed at measured distances apart so that there is approximately a 1.5 meter difference in elevation between contours.
Terracing
Terracing should begin at the top of your hillside, lest runoff from above washout your work during a storm.
Once a contour line has been established, a small ditch or trench should be dug to connect the stakes--on the downhill side. The material removed from the trench should be placed carefully on the uphill side to form a raised barrier, or berm—this small elevation of material will form your planting bed.
If a hillside is not particularly steep, two rows of vegetation can be planted on either side of the contour line in lieu of digging trenches (system B, in the graphic above).
The hillside is now ready for agro forestry planting, and I commend you to read my previous blog post on the Jatropha Curcas [link].
Add new comment